I have been asked by several people how to make a MOSAIC. I will gladly share how I did this because I love it when another blogger gives out easy tips on how to make something for my blog. I am going to try to explain this as simple as possible, if I loose anyone, please leave a comment or email me and I will try to help.
First go and take pictures of what you want your mosaic to be about or look through the ones you already have. You are going to need anywhere from 36 to 5 pictures, depending on the mosaic.
You will need to have a website that will host your pictures. I used
flickr.com this can be free for the mosaic you need to make. I received a comment fromAnne-
Fiona and Twig and she said that
picnik.com has a super easy mosaic/collage maker on their site and I received a comment from
Olivia and Me and she uses
picasa, I have not tried either yet, but you are more than welcome to try either one, thanks Anne. Special note: you can make your pictures private so no one else can use them if you are worried about privacy.
You will have to upload your pictures into flickr, I found out there is a limit to how much memory they will take in one month. I have been cut off already this month but I know I was able to upload over 30 pictures, more than enough to make a mosaic.
Go ahead and create a flickr file then start uploading your pictures, flickr is basic and walks you through the steps. There are other people's pictures there, however they are not always willing to share if you do not share and many I found out are " © all rights reserved" then under no circumstances are you allowed to publish the photo without the owners permission. So it is generally best to use your own pictures.
Set your flickr account to upload a bunch of pictures at a time. This may take a while so you can go do some painting (in my case) or laundry, make dinner or whatever makes you happy.
Now that you you have your pictures uploaded you will want to go to
bighugelabs.com and go to Mosaic Maker. The first choice is to choose a layout: for mine I used 4x4 with large center. The other change I made was to change the space between images to: 0 but that was my choice.
This is the 4x4 with larger center tile:
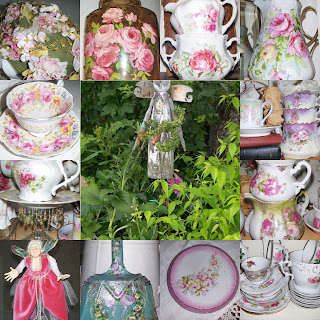
And
This is an example of a 4 column by 2 rows:
Now click on Choose Photo: this will give you a choice, this is where the flickr comes in, click on that and it will automatically show your photos. Easy huh. The first Choose Photo box is the Large box in the middle of the mosaic.
Pick out a picture and go to the next Choose Photo and do the same, and repeat, and repeat, now you have it. If you pick the wrong photo, don't worry just re-click on the photo and you can change it. Whew thought you made a mistake. Now hit create.
Now don't you just love it, or not, this is when you decide if you like certain pictures. If you don't like any of it or just a certain picture, click edit at the top and it takes you back to the page you were originally working on If you do like it, at the bottom of the page it shows you the HTML and you can save the html in your blog in a picture under add a gadget. Or if your computer has the option you can save in files, that is what I did, I just right clicked on my mouse and save picture as: and I saved it in my pictures files.
I hope I have made this simple enough for you to enjoy doing for yourself. If there is any part that you do not understand, do not hesitate to send me an email or shoot me a comment and I will help you the best I can.
I also hope to see lots of new Mosaics on MOSAIC MONDAY at
The Little Red House.


